****
English below
*****
Daar is de blog, waar vele van jullie al een tijdje op wachten, dan eindelijk. De uitleg van de steek die ik gebruikte voor mijn strepen dekentje, de Full of Stripes deken.
Voor mijn dekentje gebruikte ik restjes uit mijn voorraad. Maar, zoals bij mij vaak gebeurd met een restjes project, heb ik er toch nog wat bolletjes bij gekocht. Niet dat ik niet genoeg restjes heb, maar meer omdat ik de kleurencombinatie zo leuk vond worden en daar geen andere kleurtjes meer bij wilde doen.
Ik gebruikte garens van Fonty, Katia, Borgo de Pazzi en Rico Design. Mocht je de kleurencombinatie heel leuk vinden en eigenlijk ook daarmee aan de slag gaan. Dan kun je ervoor kiezen om de deken te haken met bijvoorbeeld Amore 160 van Borgo de Pazzi. De kleuren die het meeste overeenkomen met de kleuren die ik gebruikte zijn: 142 (vintage groen), 143 (vintage donkergroen), 101 (ecru), 127 (lichtbruin), 160 (ijsblauw). Maar hoe leuk is het om gewoon lekker met jouw eigen kleurcombinatie aan de slag te gaan.
*****
There's the blog, which many of you have been waiting for for a while, finally. The explanation of the stitch I used for my striped blanket, the Full of Stripes blanket.
For my blanket I used leftovers from my stock. But, as often happens to me with a leftover project, I still bought some extra yarn. Not that I don't have enough leftovers, but more because I liked the color combination so much and didn't want to add any other colors.
I used yarns from Fonty, Katia, Borgo de Pazzi and Rico Design. If you really like the color combination and actually get started with it. Then you can choose to crochet the blanket with, for example, Amore 160 from Borgo de Pazzi. The colors that most closely match the colors I used are: 142 (vintage green), 143 (vintage dark green), 101 (ecru), 127 (light brown), 160 (ice blue). But how nice is it to just get started with your own color combination.
Hoe haak je de steek?
Start met een oneven aantal steken.
Toer 1: 2 halve stokjes samen over de 4e en 5e losse vanaf de haaknaald.
*1 stokje in dezelfde losse als de voorgaande steek, 2 halve stokjes samen over de volgende 2 lossen.*
Herhaal *-* tot het einde van de toer.
Toer 2: 3 lossen, 2 halve stokjes samen over het eerste samen gehaakte halve stokje en het volgende stokje.
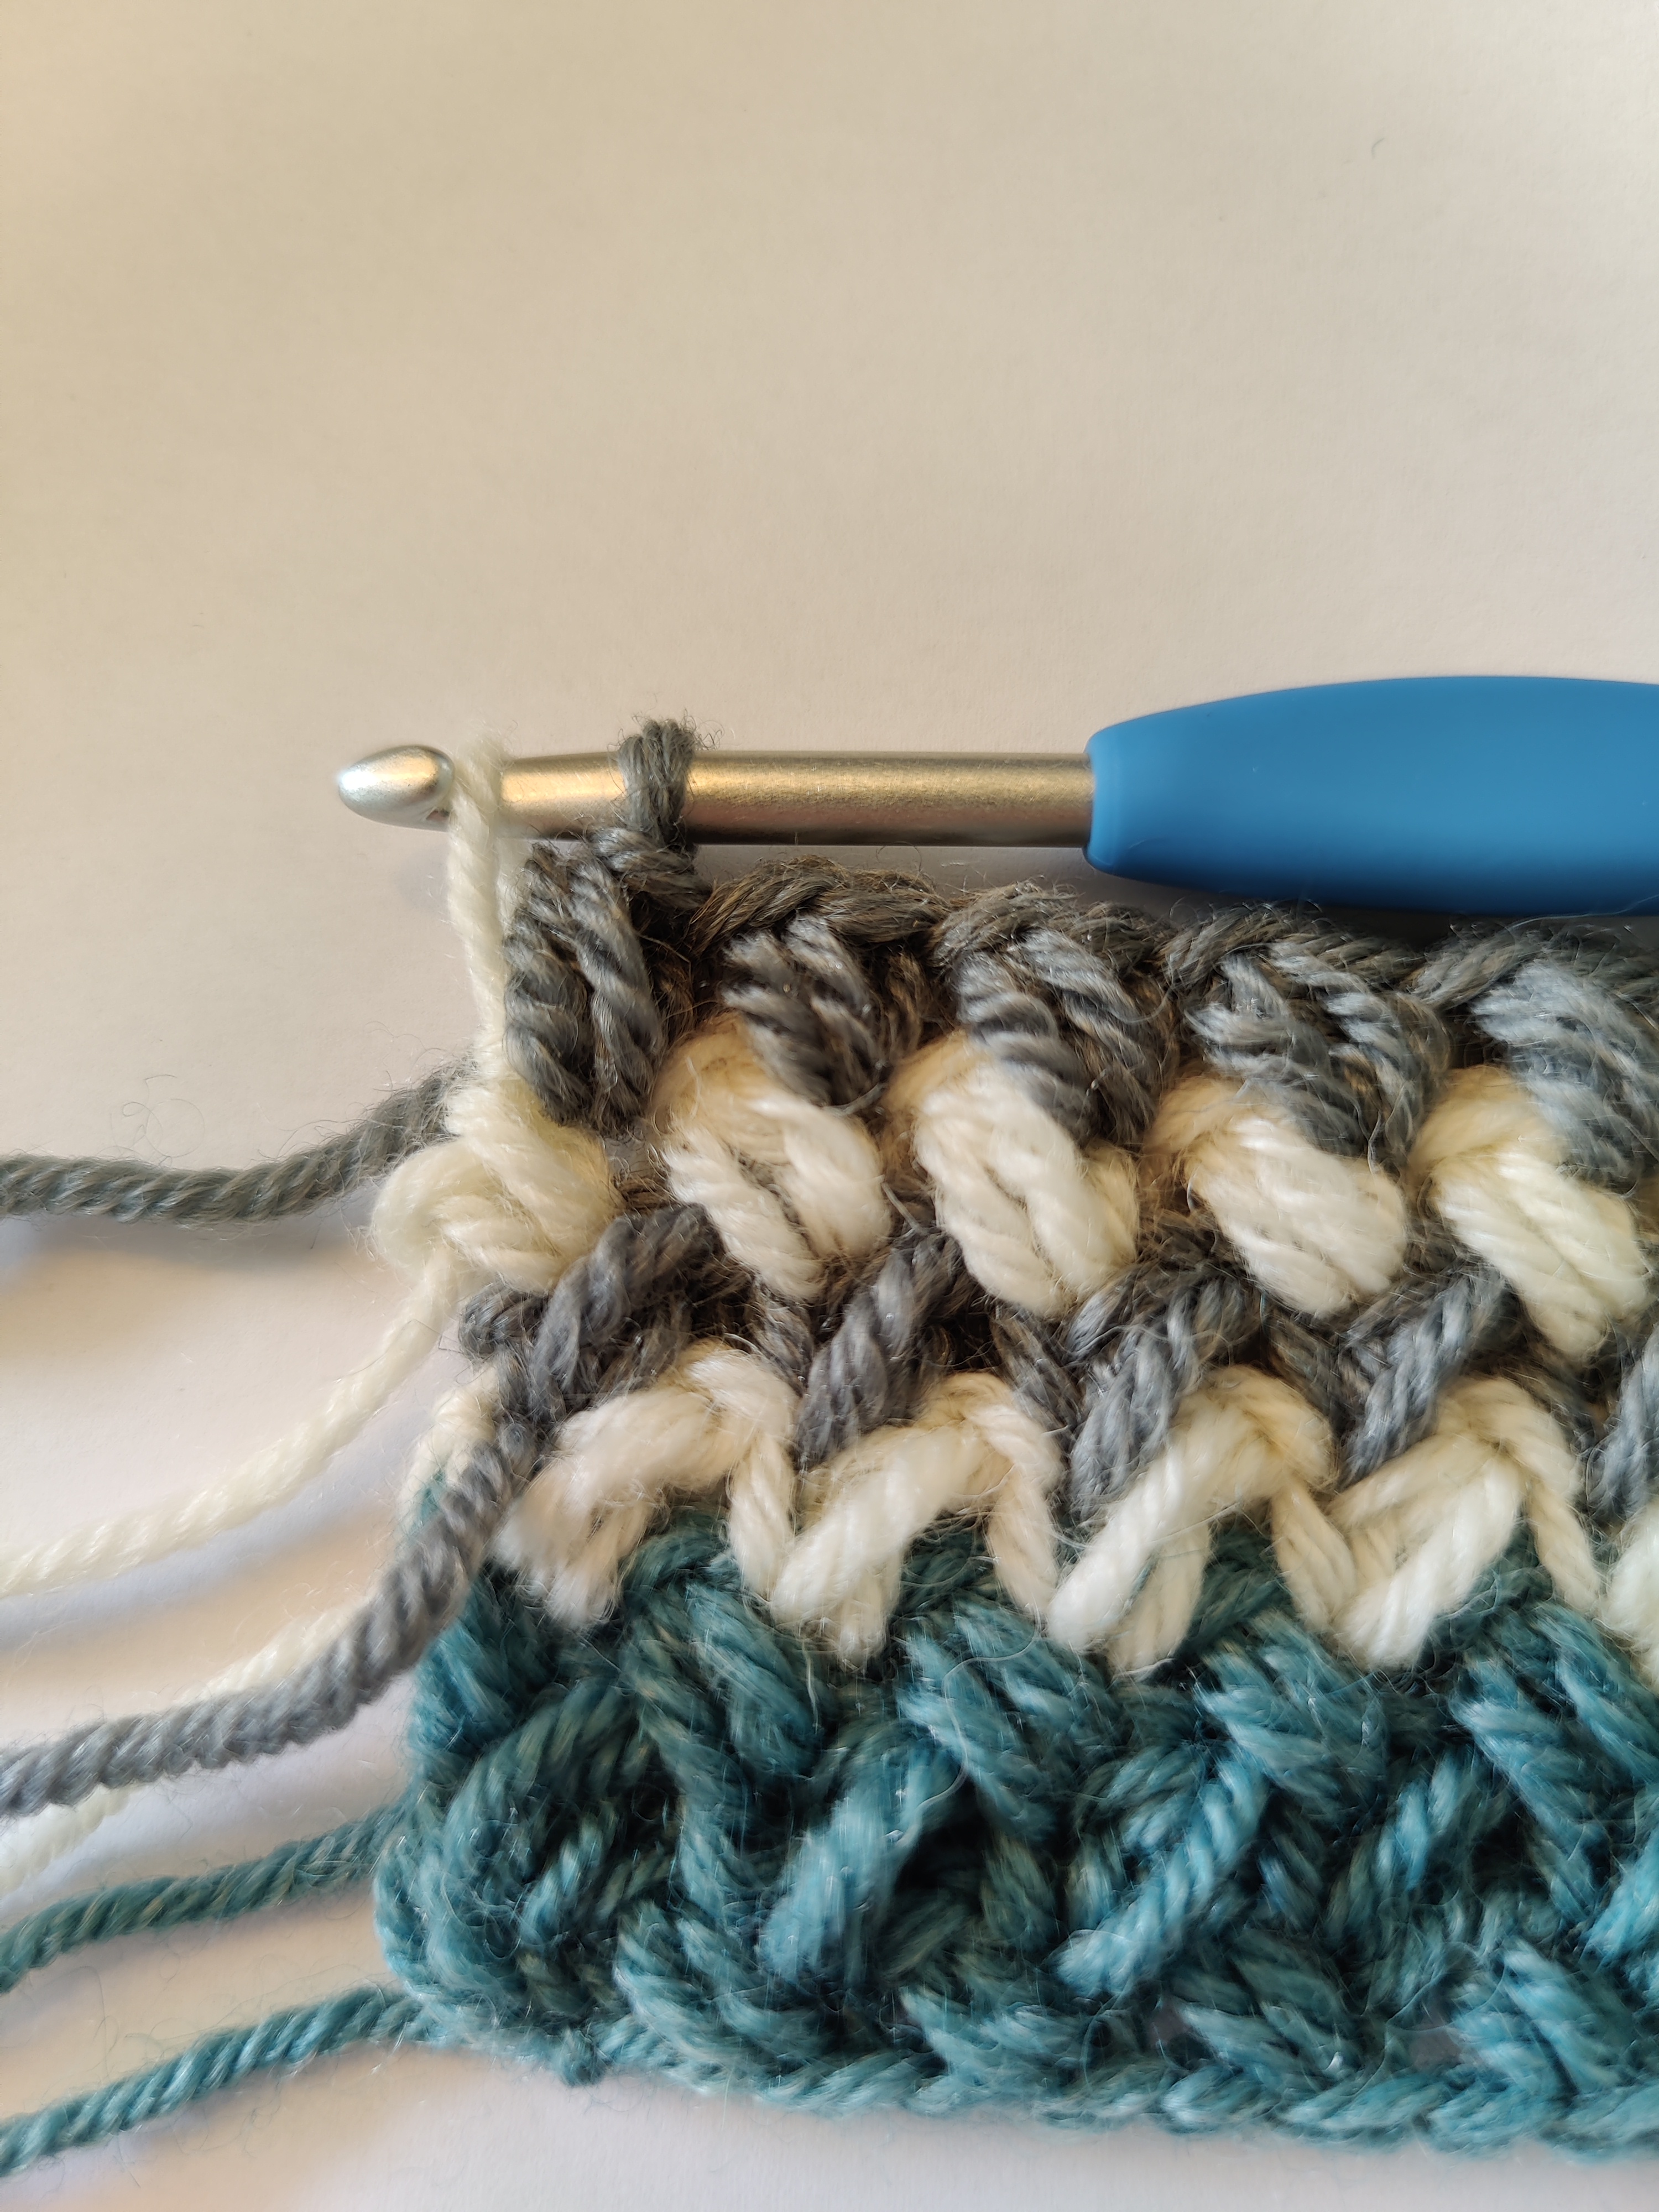
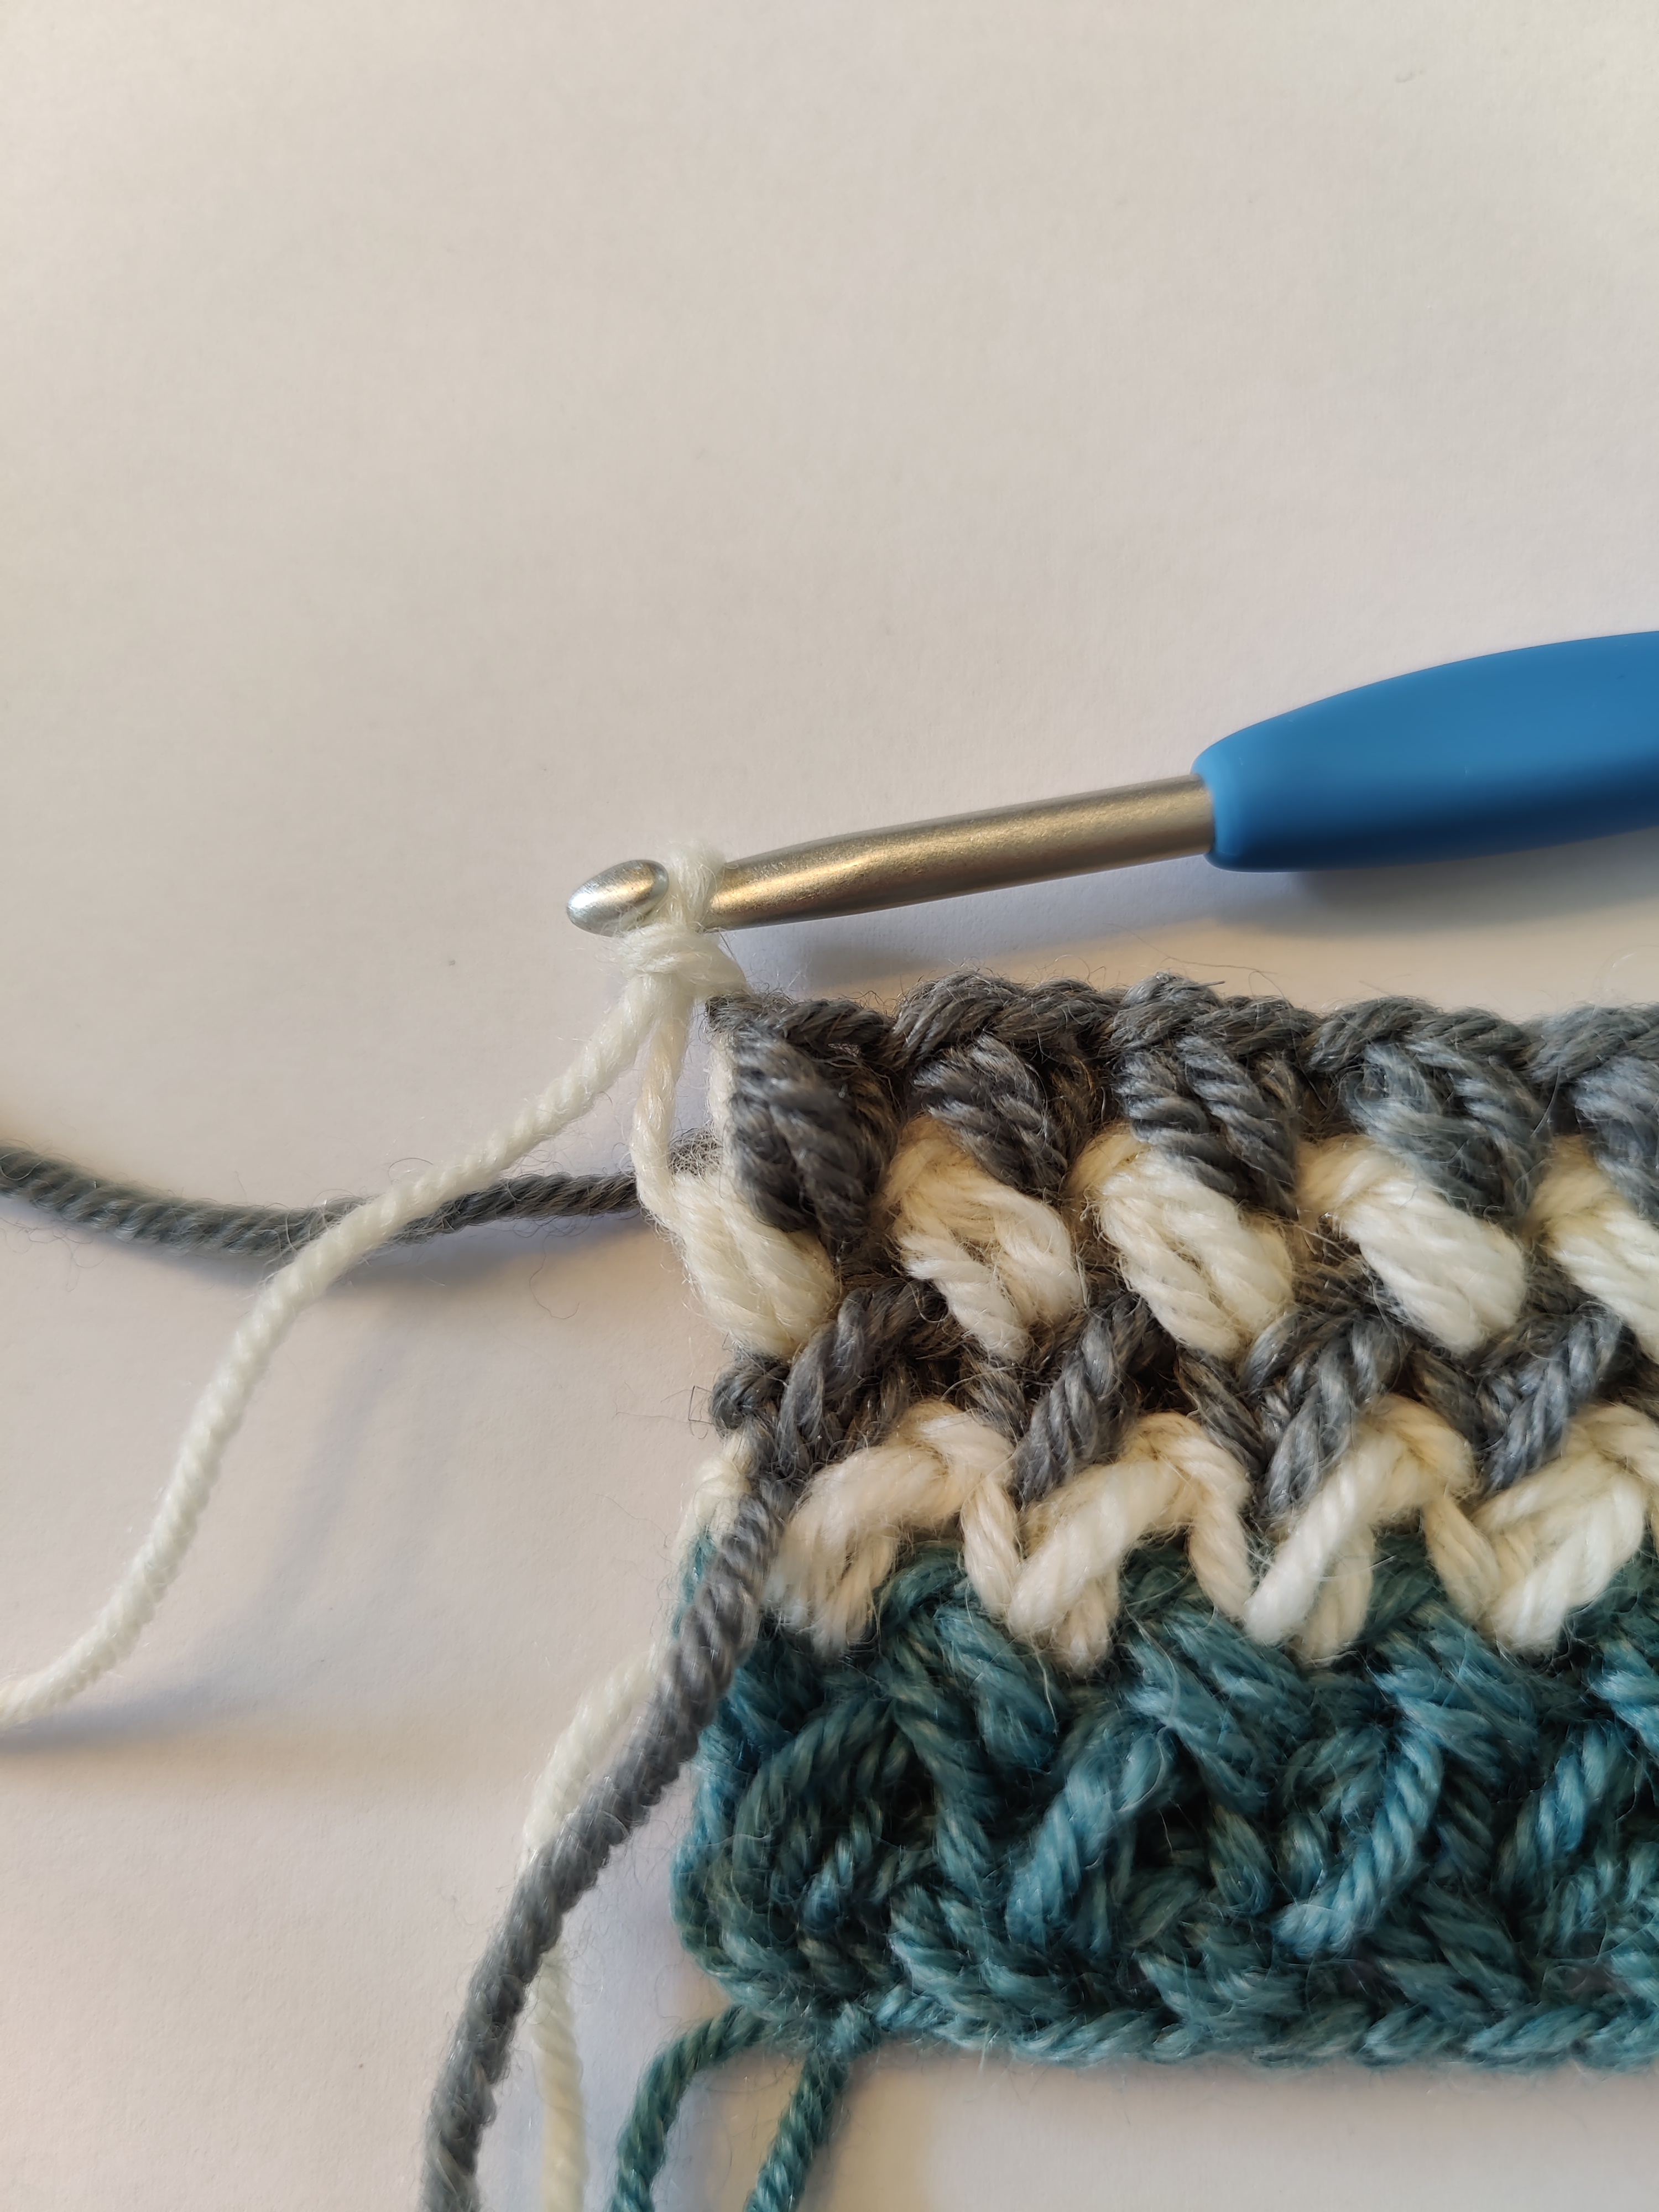
*1 piekstokje ingestoken in de onderliggende toer, in de opening tussen de twee laatst gehaakte steken, 2 halve stokjes samen over het volgende samen gehaakte halve stokje en het volgende stokje.*
Herhaal *-* tot het laatste samen gehaakte halve stokje. Eindig met 2 halve stokjes samen over het laatste samen gehaakte halve stokje en de 3e keerlosse.
Toer 3: 3 lossen, 2 halve stokjes samen over het eerste samen gehaakte halve stokje en het volgende piekstokje.
*1 piekstokje ingestoken in de onderliggende toer, in de opening tussen de twee laatst gehaakte steken, 2 halve stokjes samen over het volgende samen gehaakte halve stokje en het volgende piekstokje.*
Herhaal *-* tot het laatste samen gehaakte halve stokje. Eindig met 2 halve stokjes samen over het laatste samen gehaakte halve stokje en de 3e keerlosse.
Toer 4: Herhaal toer 3.
Om te zien waar je de haaknaald moet insteken, bekijk dan dit filmpje.
How to crochet the stitch?
Start with an odd number of chain stitches.
Row 1: 2 half double crochets together over the 4th and 5th chain stitch from the hook.
*1 double crochet in the same chain stitch as the previous stitch, 2 half double crochets together over the next 2 chain stitches.*
Repeat *-* until the end of the row.
Row 2: Chain 3, 2 half double crochets together over the first half double crochet together and next double crochet.
*1 spiked double crochet inserted in the previous row, in the space between the two last crochet stitches, 2 half double crochets together over the next half double crochet together and the next double crochet.*
Repeat *-* until the last half double crochet together. Finish with 2 half double crochets together over the last half double crochet together and the 3rd chain stitch.
Row 3: Chain 3, 2 half double crochets together over the first half double crochet together and the next spiked double crochet.
*1 spiked double crochet inserted in the previous row, in the space between the two last crochet stitches, 2 half double crochets together over the next half double crochet together and the next spiked double crochet.*
Repeat *-* until the last half double crochet together. Finish with 2 half double crochets together over the last half double crochet together and the 3rd chain stitch.
To see where to insert the hook, you can watch this video.
*****
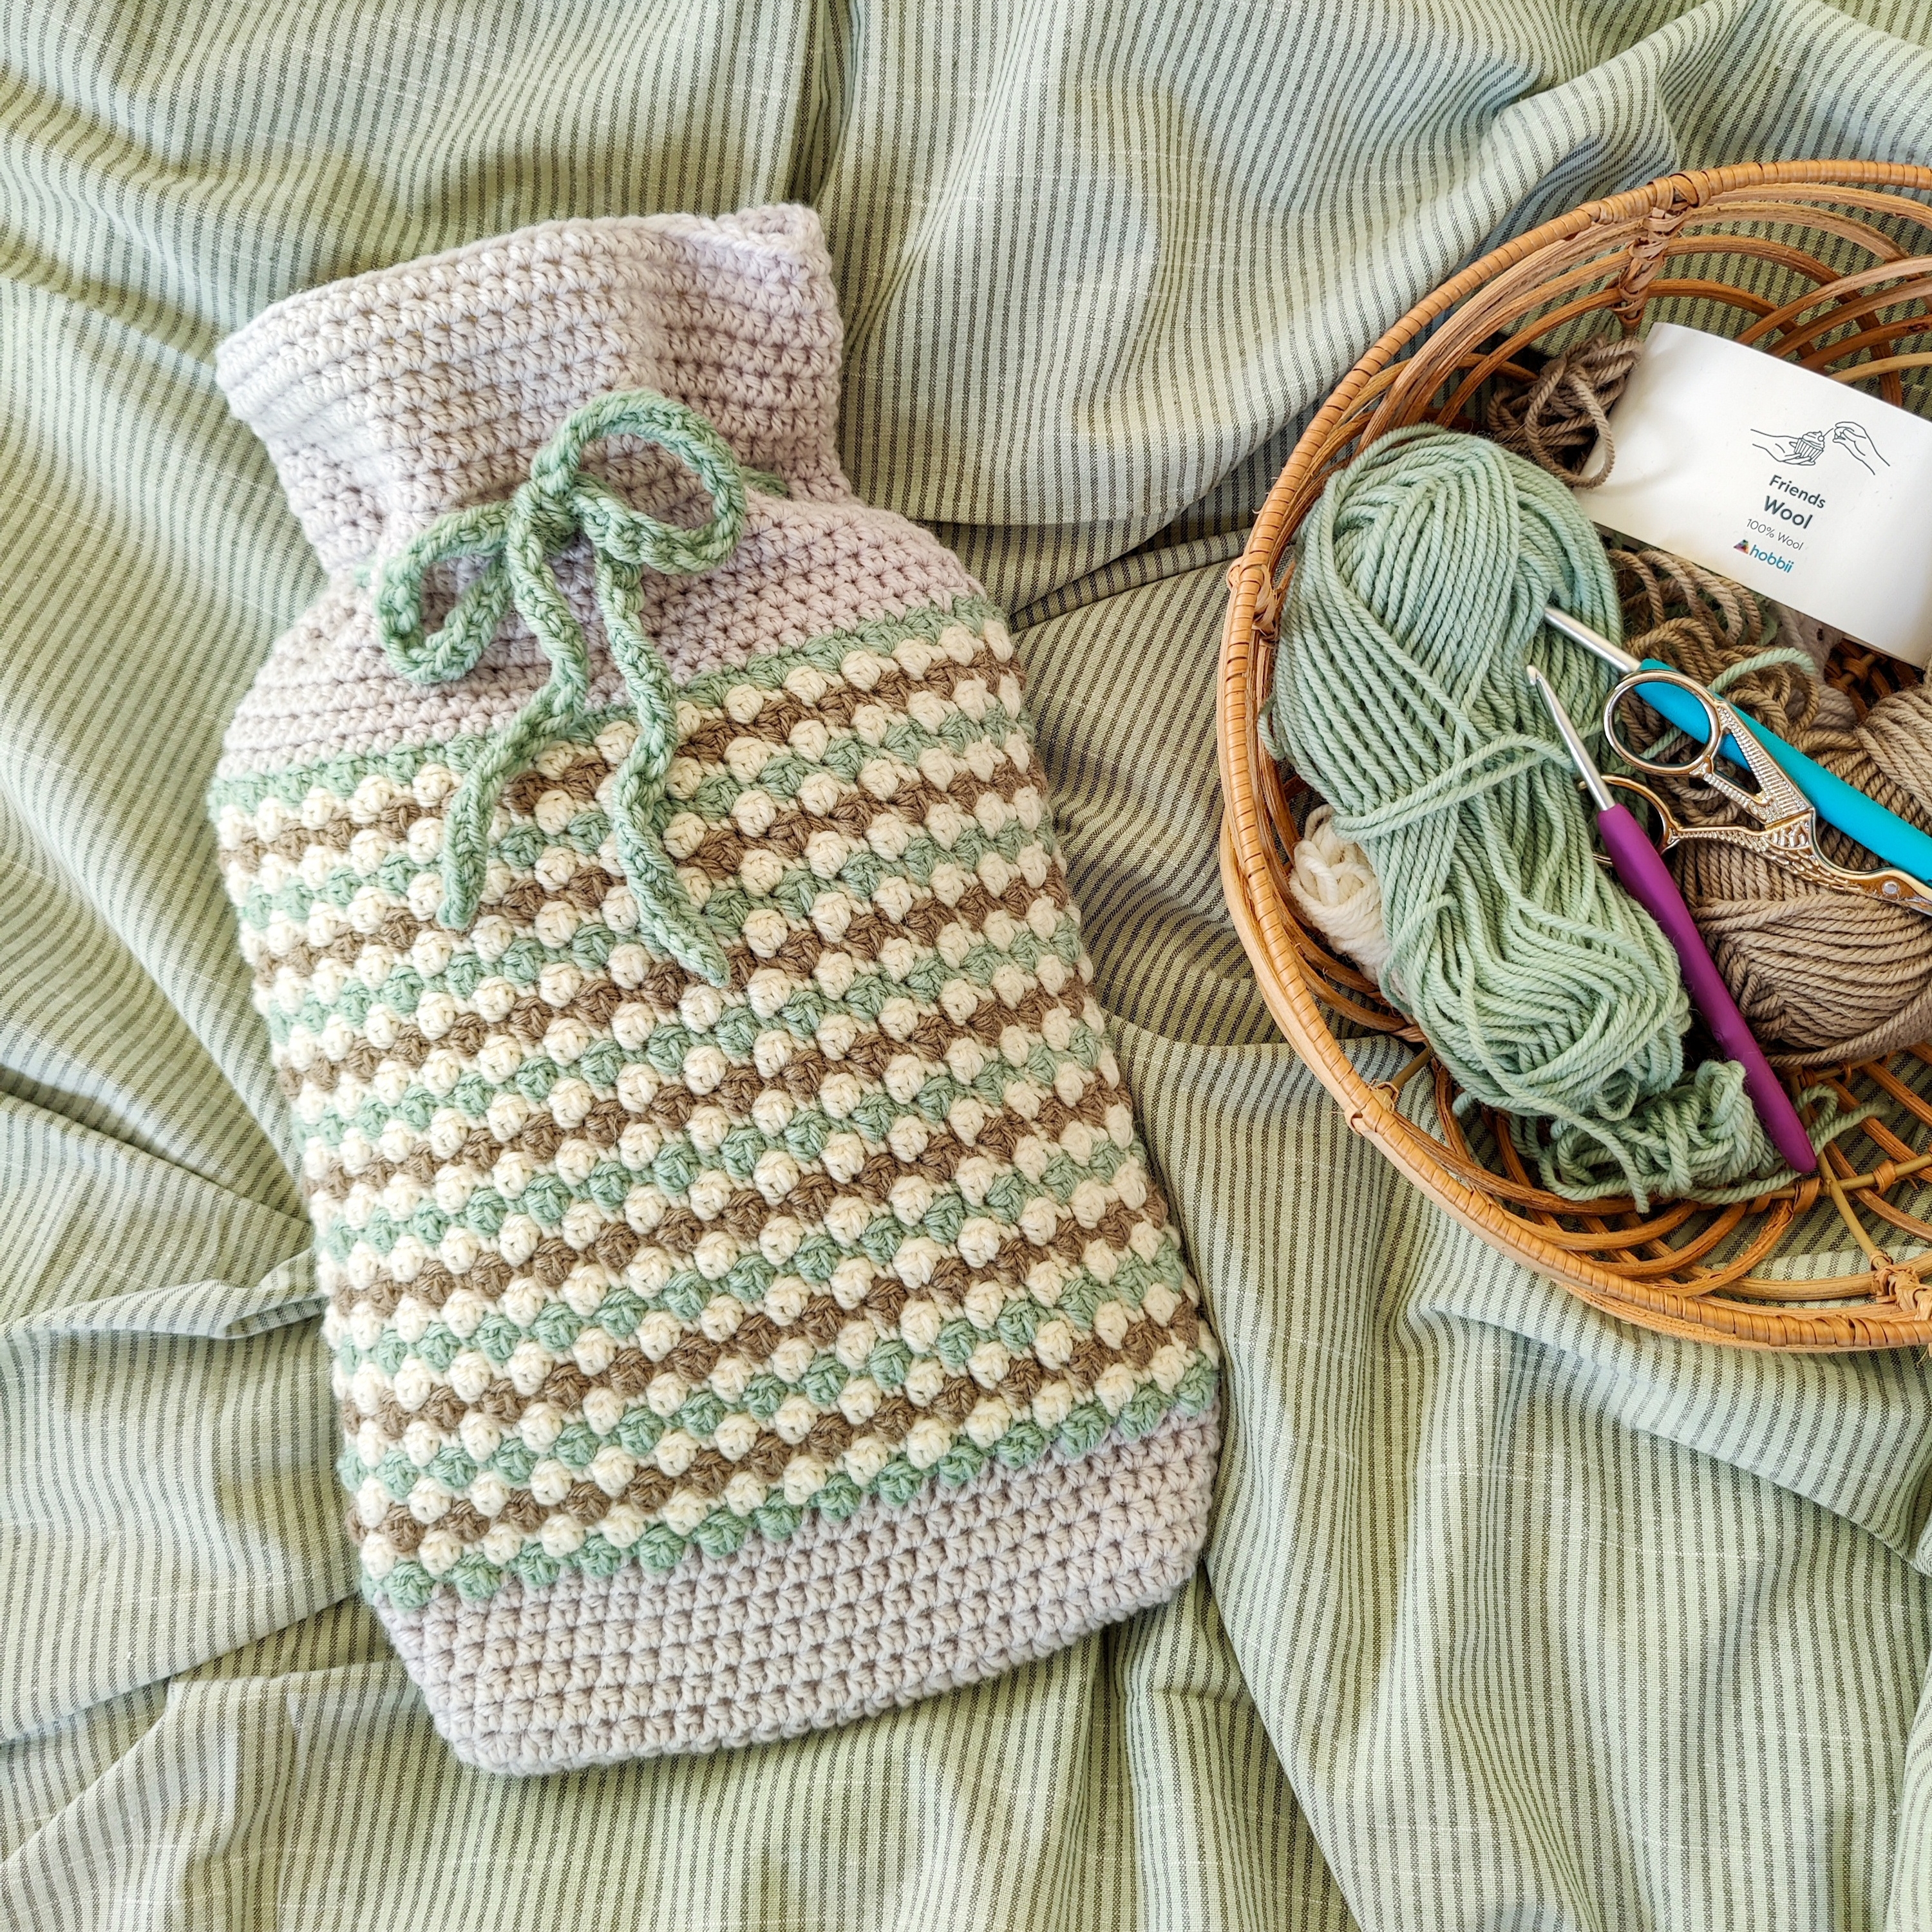
Met deze steek kun je natuurlijk van alles haken. Wat dacht je van een warme sjaal, of een tof kussen.
Voor mijn deken gebruikte ik haaknaald 5 mm en begon ik met 129 lossen. Daarmee werd mijn dekentje (zonder rand) circa 100 cm breed. Na iedere 3 toeren wisselde ik van kleur. Dit deed ik heel willekeurig, een beetje kijkend naar de hoeveelheid garen van alle kleuren die ik had liggen. Uiteindelijk werd mijn dekentje (zonder rand) circa 105 cm hoog.
Na een aantal keer twijfelen over een toffe rand, heb ik gekozen voor halve stokjes gehaakt in de derde lus.
Ben je benieuwd hoe je die haakt, bekijk dan dit filmpje.
With this stitch you can of course crochet anything. How about a warm scarf, or a cool pillow.
For my blanket I used crochet hook 5 mm and started with 129 chain stitches. This made my blanket (without border) about 100 cm wide. After every 3 rows I changed colors. I did this very randomly, looking a bit at the amount of yarn of all the colors I had lying around. Eventually my blanket (without border) was about 105 cm high.
After a number of doubts about a cool border, I opted for half doubled crochets in the third loop.
If you are curious how to crochet it, watch this video.
*****
Dit patroon is ontworpen door Created by Carolien. Het is niet toegestaan het patroon te delen, verspreiden, vertalen of kopiëren. Het is wel toegestaan het gehaakte product in een kleine oplage te verkopen.
Mocht je nog vragen hebben over het patroon, laat het me dan weten. Je kunt dan een mail sturen naar createdbycarolien@gmail.com.
Ik vind het leuk om jullie gehaakte dekens te zien. Dus heb je de deken gehaakt en vind je het leuk om deze te delen op Instagram. Tag mij dan in jouw foto en gebruik #fullofstripesblanket. Dan kom ik een kijkje bij je nemen!
Heel veel haakplezier!
Liefs Carolien
- Created by Carolien -
*****
This pattern is designed by Created by Carolien. I do not give my permission to have my pattern shared, distributed, translated or copied. You may however sell your handmade items that use this pattern.
If you have any questions about the pattern, please let me know. You may email me directly at createdbycarolien@gmail.com
I’d love to see your progress and completed blankets, I’m sure they will be beautiful! Please use #fullofstripesblanket on Instagram and tag me, so I can see it.
Have fun crocheting!
Love Carolien
- Created by Carolien -


.jpg)
-01.jpeg)
.jpg)

.jpg)
-01.jpeg)
.jpg)

.jpg)
.jpg)
-01.jpeg)
-01-01%20(1)%20(1)%20(2).jpg)

-01.jpeg)
.jpg)